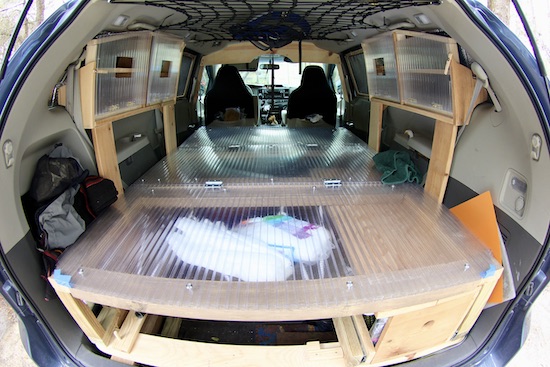
Sienna Van Camper Re-Converion
Thank you for reading my post on the Sienna Van Camper Re-Converion. The van in question is a 2014 Toyota Sienna with about 135,000 miles on it. It’s just about broken in, I’d guess.
Motivated by Susan, I tore the original camper build apart and started from scratch. These photos show the new build.
1. From bottom left, clockwise:
– at the bottom on a vertical support is a small blue-black dot, the light switch for the “trunk.” Directly above it is a large black square, the electrical distribution panel, a.k.a. fuse box. Above that is the charge controller, which takes the raw electrical input from the solar panel (not shown) and feeds it to the battery. The fuse box and controller are mounted on the face of the main storage cabinet. Along the top is a rack, storage for linens, towels, shopping bags, etc. Along the top right side of the frame is Susan’s storage cabinet. On the bottom right is a yellow extension cord. The red and black cables are the solar panel electrical feeds. In the center is the couch/bed, shown in the couch position. You can couch out the back or in the van. All the interior lights are turned on.
2. Close-up of the fuse box and charge controller. Above the fuse box is a light switch and a 12-volt plug. You can see I’ve tossed some essentials into the cabinet. Don’t forget the loo roll. The red-orange thing below it is a knife sharpener.
3. Same shot as 2, with the panel open. There are 15 different circuits, not all in use.
4. View of the “trunk”. The usual trunk junk and the all-important battery.
5. View from passenger sliding door, from top left. Susan and I both have reading lamps. In between is the ceiling storage rack, currently just holding a couple shopping bags. The main storage cabinet’s front face has 12-volt plug, a power strip (we have an inverter that changes the 12-volt DC current to 110-volt AC current), the battery power gauge, and the switch that turns the inverter on/off. In front of that is the sink on a vanity. Extending across the van from that is the dining table, and of course, the couch/bed, still in the couch position.
6. The back windows are screened. The sink has a 5-gallon reservoir in the vanity, along with an electric pump to deliver the water (cold only). It drains (by gravity) into another 5-gallon jug. The counter top was polyurethaned to protect it (we hope) from moisture.
7. View from the couch, from left clockwise. Above the sink is a black blob, my fan. Next to it is a 12-volt plug that supplies its power, and a light switch that turns the light strip on and off. The headboard has hooks (actual fishhooks!) that keep clothes and hats off the floor. To the right of Susan’s hat and the paper towel roll is Susan’s fan with another 12-volt plug. And the table.
8. A view from the table, dominated by the guy who did all the work. He looks like he’s wondering, When did I get to be the same age as old people?? You can see Susan’s cabinet with a 12-volt plug and her reading lamp.
No holes were made in the van for this build. If this van dies, I could remove all this stuff and put it in another Sienna in a day or two, and most of that time would be spent on the wiring.
I would like to thank Eric enjoys Earth for his many design ideas that were incorporated into this build. Anyone considering a van conversion should check out Eric’s youtube channel!
And that, folks, is the Sienna Van Camper Re-Converion post. Thanks again for reading!
Every day is a blessing. Don’t waste it- Go fishing! Go paddling! Convert a van! Stay active!
John Kumiski
www.johnkumiski.com
www.spottedtail.com
www.spottedtail.com/blog
All content in this blog, including writing and photos, © John Kumiski 2024. All rights are reserved.


Speak Your Mind