The Kumiski Report
Thank you for reading this week’s report. Tuesday the thought came to me- You forgot to post a blog Saturday. That can’t be right! I checked. I forgot. My apologies. I have a double feature this week.
Paddle Craft- The Do-It-Yourself Canoe
by John Kumiski
After visiting the Canadian Canoe Museum (https://canoemuseum.ca), I felt compelled to build a canoe. The museum was magnificent! Hundreds of exquisite hand-crafted boats- birchbark canoes, dugouts, strip canoes, skin-on-frame boats, more. The ghosts of the builders of those boats filled that hall, all whispering to me- “John! Build a boat!” It was the nicest I’d ever been haunted.
After returning home, I started doing research. Too big. Too heavy. Too complicated. Too expensive. I found Brian Schultz’s Cape Falcon Kayaks site (https://cape-falcon-kayak.thinkific.com). There it is! My new canoe!
In October, I bought plans for a skin-on-frame canoe and the instructional video course for $150. Now there were lots of tools and materials to buy. Christmas was coming.
Santa was good, providing quite a few needed tools. I started looking for wood, and bought the rest of the necessary tools. Some of the wood proved hard to find, and was more expensive than I had anticipated. Western cedar from the Pacific northwest, and white oak from Wisconsin, were supplemented with local cypress and ash.
I (with some help) started cutting, and drilling, and gluing, and sanding, and lashing. A wave of emotion swept through me after I put a spreader between the gunwales, then pinched both the ends together. A canoe shape! Holy cow!
After cutting, I steamed and bent the oak to make the ribs. They fitted into mortises in the gunwales. Then cedar strips, the stringers, were lashed to the ribs to finish the frame. That frame looked awesome, and only weighed about 20 pounds.
All through the frame-building process, whenever there were questions or problems, I would text Brian Schultz. His support and encouragement were incredible. All customer service should be this good.

The next step was to skin the boat. Brian recommends using 840 X-TRA Tuff Ballistic Nylon. That’s right- my boat is skinned with nylon. Putting the nylon over the frame took an entire morning. After letting it sit for a couple days, over that nylon went four coats of two-part Urethane Coating. All this was purchased as a kit from the Skin Boat Store.
After allowing the urethane to dry for a couple days, I was hot to take the canoe for a water test. Not so fast, Buckaroo! Flotation needed to be installed. I went high-tech, using four pool noodles lashed to the frame, two on each side. Eye straps were attached to the bow and stern stems, and a 12-foot long painter was tied to each. My kayak seat clips to the center rib perfectly. I got a foam sleeping pad, and a floatation cushion, and a double-bladed paddle, and a single-bladed paddle, and my wife, and everything went to the local pond.

I must have looked ridiculous paddling that canoe around the pond, grinning like the Cheshire Cat the entire time. The boat didn’t roll right over, it paddled as well as any boat I’ve ever paddled, I could pick it up with one hand (finished weight- a whopping 26 pounds), and I made it. Incredible!
This canoe is completely customizable within certain parameters, about 12- to 17-feet. You can build a set of them that nest into each other like those famous Russian dolls. You can catamaran them together. You can add a sailing rig. I have every intention of doing that. The mast step is already installed in my boat.
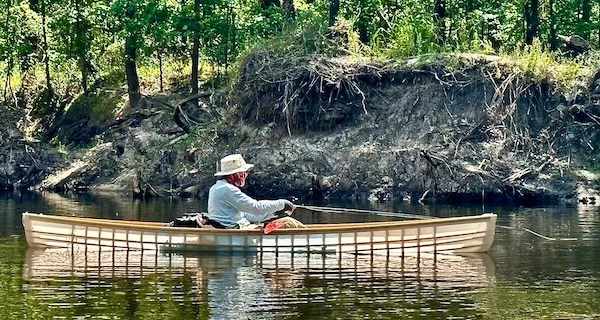
It’s still a new toy, but building this canoe was an extraordinary learning experience. I have only the finest things to say about Brian Schultz and his course. It helped me successfully complete one of the finest projects I’ve ever done. And you could do it, too!
_________________________________________
Kayak Fishing out of Everglades City- Four Camping Options
by John Kumiski
Everglades National Park remains a go-to destination for many Sunshine State anglers. Why wouldn’t it be? The combination of natural beauty, vast areas to fish, and a wide variety of saltwater fish species combine for a powerful appeal.
Paddling anglers who want to camp can do so easily at Flamingo. There’s a campground right there! At the Everglades City end of the park, though, the story is different. You can camp there, but you need to load your gear into your boat and go paddling to do it. This piece looks at the options for a short trip, from overnight to four days or so. It’s hard to carry enough food and water in a kayak for any more time than that, anyway.
The paddling fisherman will find four islands with spectacular Gulf of Mexico frontage within three hour’s paddle of the Everglades City Ranger Station. You have to stop there to pick up your backcountry permit anyway! And, the parking there is both free and safe.
Those islands, from north to south, are Tiger Key, Picnic Key, Jewell Key, and Rabbit Key. Get ready to paddle, because here we go!
Tiger Key- the Tiger Key campsite sits on a large sandbar at the north end of Tiger Key, about a three-hour (depending on tide direction), eight-mile paddle from Everglades City. You can fish right from the campsite by casting into West Pass, where you may well see big tarpon rolling. The Gulf side of this key has been good to me while wade-fishing for redfish, trout, and snook. Jacks and ladyfish make themselves available, too.

The southern tip of the island is another good place to try. For those who wish to do more exploring, a maze of islands and bays lies off to the east- enough water and shorelines to keep paddlers exploring for weeks.
The sunrises and sunsets are both spectacular here. The no-see-ums can be, too, when the wind stops, but that’s true of all these keys.
Picnic Key- Picnic Key is right next to Tiger Key, east and south. It’s a slightly shorter distance from the ranger station than Tiger Key. The campsite here faces southwest and consists entirely of beautiful, white sand beach. I have not had much luck fishing here, but don’t have a large sample size. The water is right in front of your tent! Because the beach faces southwest, sunsets are awesome. Because the island’s vegetation is behind you, sunrises are blocked.

Like stated for Tiger Key, a maze of islands and bays lies off to the east- enough water and shorelines to keep paddlers exploring for weeks.
Jewell Key- Jewell Key is the shortest trip from the ranger station, a mere five miles. If you catch the tide right, you can make it there in an hour-and-a-half. The campsite is on a sandy isthmus between two vegetated parts of the island.

You can fish from the campsite at higher tide phases, catching snook, jacks, and ladyfish. My best luck here has come fishing the Gulf side of the island, where there is an extensive worm-rock reef. Although trout seem to be the dominant species, you might hook almost anything here. I’ve had big tarpon roll right around my kayak.

If you must explore, you’re still in the 10,000 Islands, although they are slightly farther away from this campsite.
Sunrises and sunsets? Both awesome!
Rabbit Key- Rabbit Key requires a six-mile paddle from Everglades City Ranger Station. You could cut off two miles each way by launching at Outdoor Resort in Chokoloskee, but then there’s a $10 per day parking fee per vehicle. Your choice.
Last time I camped on Rabbit Key, I was on a small beach on the Gulf side. Another party was camped on the north side, and yet another one camped on the south side. None of us realized the other folks were there until the next morning, so it’s not like any of us felt crowded.

This is a small key with a like-wise small amount of Gulf frontage. You can fish here, but if no one’s home, it will be a short trip. My favorite thing to do when camped on Rabbit Key is to head east, toward the mainland, and fish the flats and cuts around the islands there. It’s fascinating sight fishing for reds and snook, with plenty of sharks and lots of birds to see, too.

Sunrises and sunsets depend where on the island you stay. On the north side you won’t see either!
Other Considerations
Bugs- I hate headnets but there have been times out there where I wished I had one. The no-see-ums can be simply awful.
Beach Camping- bring beach stakes for your tent or learn how to make a deadman before you go. You don’t want to come back to camp and find your tent has blown away!
Navigation- I don’t care what technology you like- bring a chart and a compass.
Tides- try to use the tide to help your paddle rather than working against it. Paddling against the current is hard work. Barron River is the gauging station. Tides are roughly an hour earlier on the outside keys.
Fishing- I like starting best on a low, outgoing tide, until about halfway to high tide. When the water is too deep I can’t wade or sight-fish. It partly depends where you’re fishing. And you might feel differently!
This entire area offers fantastic kayak fishing. Regardless of which key you choose to camp at, you made the right choice!
_________________________________________
That’s this week’s Kumiski Report. Thanks for reading.
Every day is a blessing. Don’t waste it. Go fishing! Go paddling! Go walking! Stay active!
John Kumiski – https://spottedtail.com – https://www.etsy.com/shop/PhotographybyKumiski
All content in this blog, including writing and photos, ©John Kumiski 2026. All rights are reserved.